Transforming Data
Last updated on 2025-01-13 | Edit this page
Overview
Questions
- How can we transform our data to correct errors?
Objectives
- Learn about clustering and how it is applied to group and edit typos
- Split values from one column into multiple columns
- Manipulate data using previous cleaning steps with undo/redo
- Remove leading and trailing white spaces from cells
Data splitting
We can split data from one column into multiple columns if the parts are separated by a common separator (say a comma, or a space).
- Let us suppose we want to split the
scientificNamecolumn into separate columns, one for genus and one for species. - Click the down arrow next to the
scientificNamecolumn. ChooseEdit Column>Split into several columns... - In the pop-up, in the
Separatorbox, replace the comma with a space (the box will look empty when you’re done). - Important! Uncheck the box that says
Remove this column. - Click
OK. You should get some new columns calledscientificName 1,scientificName 2,scientificName 3, andscientificName 4. - Notice that in some cases these newly created columns are empty (you can check by text faceting the column). Why? What do you think we can do to fix it?
The entries that have data in scientificName 3 and
scientificName 4 but not the first two
scientificName columns had an extra space at the beginning
of the entry. Leading and trailing white spaces are very difficult to
notice when cleaning data manually. This is another advantage of using
OpenRefine to clean your data - this process can be automated.
In newer versions of OpenRefine (from version 3.4.1) there is now an option to clean leading and trailing white spaces from all data when importing the data initially and creating the project.
Exercise
Look at the data in the column coordinates and split
these values to obtain latitude and longitude. Make sure that the option
for Guess cell type is checked and that
Remove this column is not. Rename the new columns.
What type of data does OpenRefine assign to the new columns?
Both new columns will appear with green text, indicating they are
numeric. The option for Guess cell type allowed OpenRefine
to guess that these values were numeric.
Undoing / Redoing actions
It is common while exploring and cleaning a dataset to make a mistake
or decide to change the order of the process you wish to conduct.
OpenRefine provides Undo and Redo operations
to roll back your changes.
- Click
Undo / Redoin the left side of the screen. All the changes you have made will appear in the left-hand panel. The current stage in the data processing is highlighted in blue (i.e. step 4. in the screenshot below). As you click on the different stages in the process, the step identified in blue will change and, far more importantly, the data will revert to that stage in the processing.
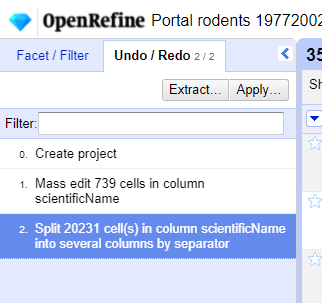
We want to undo the splitting of the column
scientificName. Select the stage just before the split occurred and the newscientificNamecolumns will disappear.Notice that you can still click on the last stage and make the columns reappear, and toggle back and forth between these states. You can also select the state more than one steps back and revert to that state.
Let’s leave the dataset in the state before
scientificNameswas split.
Trimming leading and trailing whitespace
Words with spaces at the beginning or end are particularly hard for
humans to identify from strings without these spaces (as we have seen
with the scientificName column). However, blank spaces can
make a big difference to computers, so we usually want to remove
them.
- In the header for the column
scientificName, chooseEdit cells>Common transforms>Trim leading and trailing whitespace. - Notice that the
Splitstep has now disappeared from theUndo / Redopane on the left and is replaced with aText transform on 2 cells
Exercise
Repeat the splitting of column scientificName exercise
after trimming the whitespace.
On the scientificName column, click the down arrow next
to the scientificName column and choose
Edit Column > Split into several columns...
from the drop down menu. Use a blank character as a separator, as
before. You should now get only two columns
scientificName 1 and scientificName 2.
Renaming columns
We now have the genus and species parts neatly separated into 2
columns - scientificName 1 and
scientificName 2. We want to rename these as
genus and species, respectively.
- Let’s first rename the
scientificName 1column. On the column, click the down arrow and thenEdit column>Rename this column. - Type “genus” into the box that appears.
Exercise
Try to change the name of the scientificName 2 column to
species. What problem do you encounter? How can you fix the
problem?
- On the
scientificName 2column, click the down arrow and thenEdit column>Rename this column. - Type “species” into the box that appears.
- A pop-up will appear that says
Another column already named species. This is because there is another column with the same name where we’ve recorded the species abbreviation. - You can use another name for the
scientificName 2or change the name of thespeciescolumn and then rename thescientificName 2column.
Edit the name of the species column to
species_abbreviation. Then, rename
scientificName 2 to species.
Combining columns to create new ones
The date for each row in the data file is split in three columns:
dy (day), mo (month), and yr
(year). We can create a new column with the date in the format we want
by combining these columns.
Click on the menu for the
yrcolumn and selectEdit column>Join columns....In the window that opens up, check the boxes next to the columns
yr,mo, anddy.Enter
-as a separator.Select the option
Write result in new column namedand writedateas the name for the new column.-
Click
OK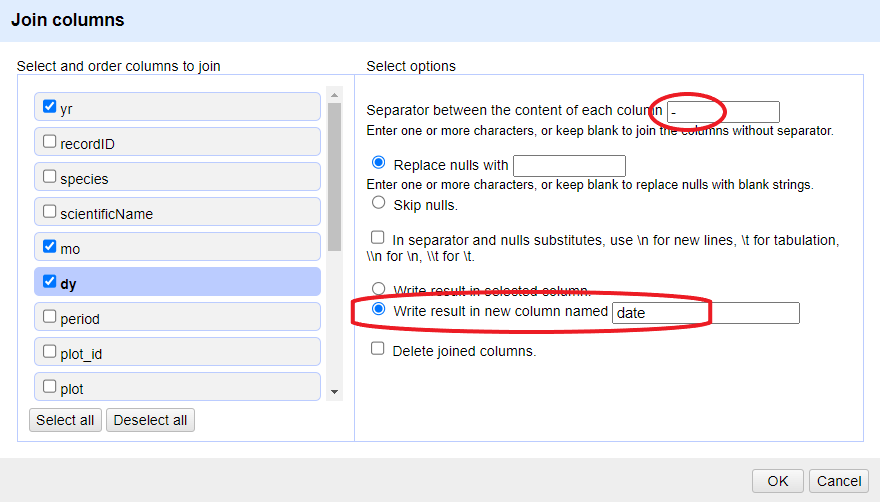
You can change the order of the columns by dragging the columns in the left side of the window.
Once the new column is created, convert it to date using
Edit cells > Common transforms >
To date. Now you can explore the data using a timeline
facet. Create the new facet by clicking on the menu for the column
date and select Facet >
Timeline facet.
Data clustering
Clustering allows you to find groups of entries that are not
identical but are sufficiently similar that they may be alternative
representations of the same thing (term or data value). For example, the
two strings New York and new york are very
likely to refer to the same concept and just have a capitalization
difference. Likewise, Björk and Bjork probably
refer to the same person. These kinds of variations occur a lot in
scientific data. Clustering gives us a tool to resolve them.
OpenRefine provides different clustering algorithms. The best way to understand how they work is to experiment with them.
The dataset has several near-identical entries in
scientificName. For example, there are two misspellings of
Ammospermophilus harrisii:
- Ammospermophilis harrisi and
- Ammospermophilus harrisi
If you removed it, reinstate the
scientificNametext facet (you can also remove all the other facets to gain some space). In thescientificNametext facet box - click theClusterbutton.In the resulting pop-up window, you can change the
Methodand theKeying Function. Try different combinations to see what different mergers of values are suggested.If you select the
key collisionmethod and themetaphone3keying function, it should identify one cluster:

Note that the
New Cell Valuecolumn displays the new name that will replace the value in all the cells in the group. You can change this if you wish to choose a different value than the suggested one.Tick the
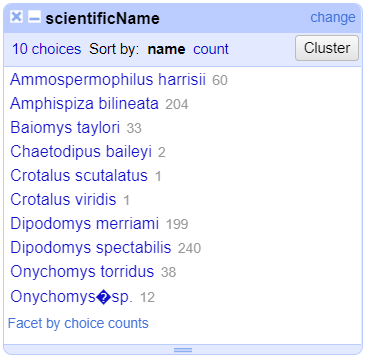
Merge?checkbox beside each group, then clickMerge selected & Closeto apply the corrections to the dataset and close the window.The text facet of
scientificNamewill update to show the new summary of the column. It will now have ten options:
Clustering Documentation
Full documentation on clustering can be found at the OpenRefine Clustering Methods In-depth page of the OpenRefine manual.
- Clustering can identify outliers in data and help us fix errors in bulk